HOW TO MAKE A MANGO LASSI
Every designer needs to feed their creativity. This is a fun way to take a refreshing break before you get back into the creative game. Below I am going to give you a recipe, and basic instructions, but then an explanation for how to cut an mango (since I goofed this up on my first attempt. Hope this helps). First things first…

The Recipe
To make a mango lassi smoothie you will need:
- Plan yogurt (1 cup): I prefer Greek yogurt.
- A whole mango: If you want to cheat, look for Mango pulp and use a cup.
- Milk (1 cup): I use almond milk.
- Ice cubes (fill a 1-2 cup measure): leave the ice in the freeze until right before you use it.
- Honey (to taste): Use any sweetner you want. Honey tastes the best with the mango, in my opinion.
- (Optional) Mint leaves (a cluster): This is not required but smells awesome when you drink the smoothie.
Equipment
You are going to need a blender. I have a Ninja blender which makes prep and clean up easier. Do what you need to do. This is basic blending.
The instructions
- From the blades up, put in the mango, then the yogurt, and then the milk.
Blend this until it is a smooth and single cream color. It should become lighter as the yogurt and mango mix together.
- Open the blender and take a sample taste with a spoon. This is where you add sweetener to your liking. Just add it, stir a bit and taste again. I recommend around a tablespoon maybe? Other people use Stevia or Maple Syrup as alternatives to honey.
- You have the lassi bit done. Now we add the ice to turn this into a cold smoothie. Put in about half of the ice and blend this down but do not aim to liquify it.
- While you still hear it grinding away at the ice, toss in the other half of the ice. This will keep the ice more granular and spread the cold temperature throughout the drink.
- (Optional) Pour into glasses and top of the drink with a sprig of mint leaf if you have one.
How to cut a mango: an explanation
I messed this up when I tried this the first time. Here is what you need to know:
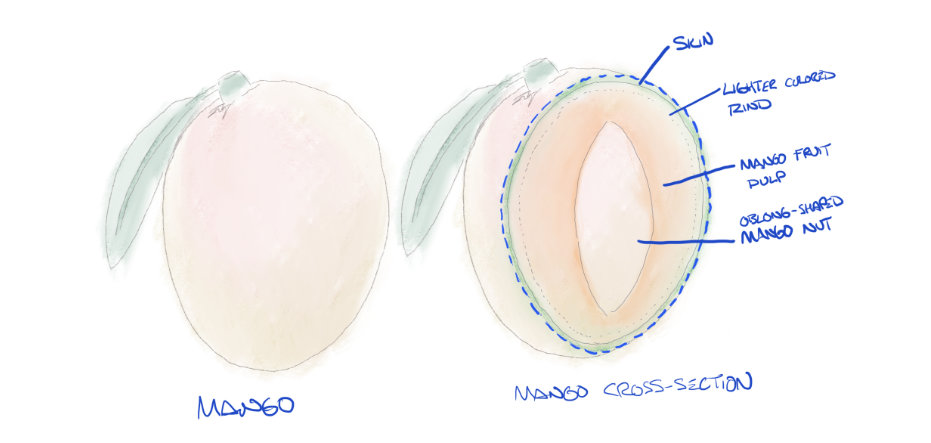
Mangos have an oblong nuts in them:
 When you cut open a mango you do not want to scrape shards of that nut into your mango pulp, so you need to cut around it. The key here is to cut gently. The nut isn’t very hard and like I said, you don’t want that bitter thing in your drink.
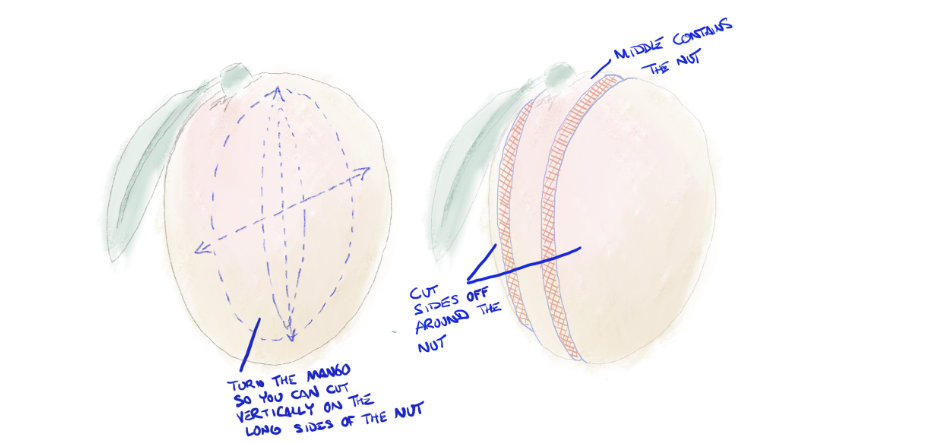
Orient the Nut and cut out on either side of it
 You may have to cut, top down, into in a couple times to find the right angle and then move the knife around the nut to cut out on either side. Once you do that, you should have three parts:
- A right and left side
- A center area with the oblong nut inside it
If you want to get some fruit pulp from around the nut, you can try but this can be difficult. I recommend, first cutting closer and carefully around the nut and then carving the skin from the fruit pulp you were able to take away from the nut.
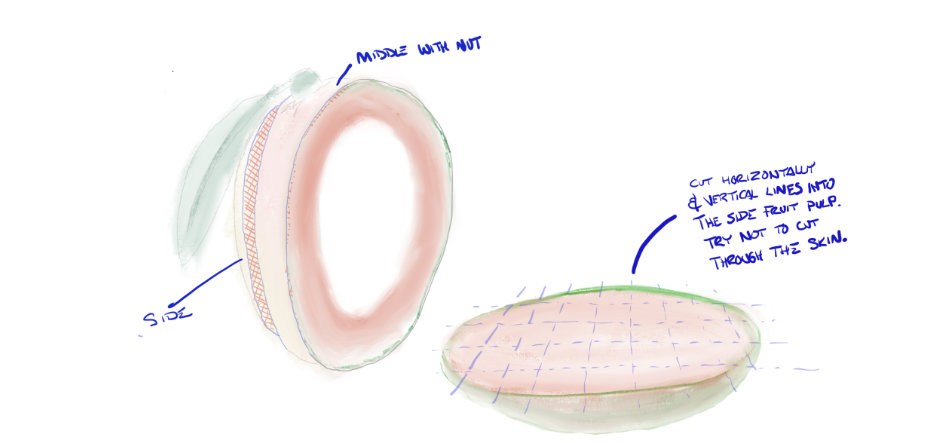
Dice the pulp in the sides
 The trick here is not to cut all of the way through the skin. In fact, aim to not cut through the skin at all. Just drag your knife through the fruit pulp in horizontal and vertical lines so you cube the pulp all of the way to the skin.
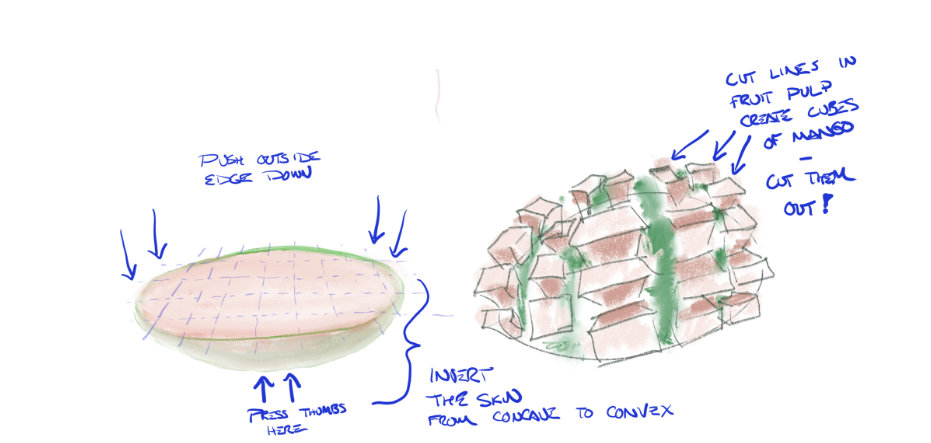
Invert the side to reveal the fruit pulp cubes
 For your final step, pick up the side with both hands, pushing your thumbs in the center of the skin and using your fingers, invert the skin so the pulp pops out, from concave to convex. This will reveal the pulp in little cubes. They are still going to be attaches to the skin, but you can remove them easily in a couple of ways:
- Cut along between the pulp cubes and the skin.
- Use your fingers and just break the cubes off into a cup.
There you go! You have cut up your mango!